Lesson Note and Lesson Plan on Biology
Types of Microscopes
Theme: Microscope
Topic: Types of Microscopes and their Principal Uses
Sub Topic: Types of Microscopes
Date: dd/mm/yyyy
Class: S.S.S 1
Duration: 30 Minutes
No of Learners: 30
Learning Objectives:
By the end of the lesson learners should be able to:Describe the use of a microscope.
A microscope is used to produce a magnified image of an object or specimen.
Defined the compound a light microscope.
The optical microscope often referred to as light microscope is a type of microscope that uses visible light and a system of lenses to magnify images of small samples.
Describe the main features and functions of the components of a compound light microscope.
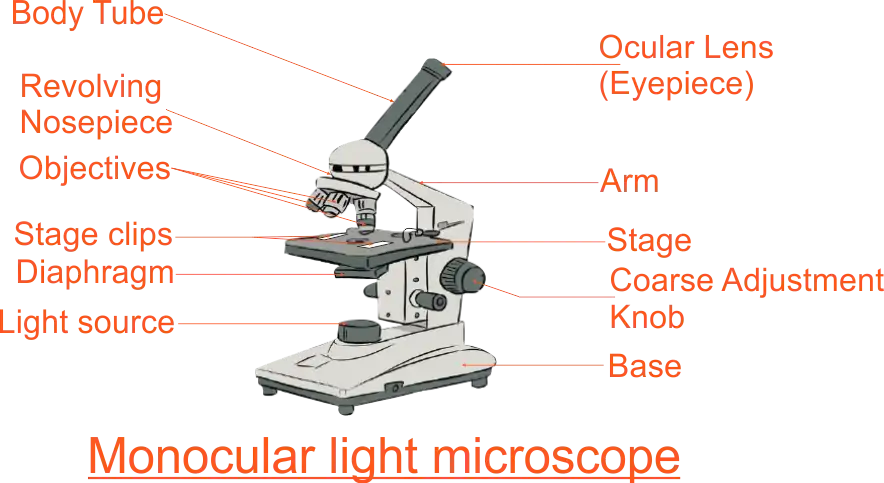 Monocular Light Microscope
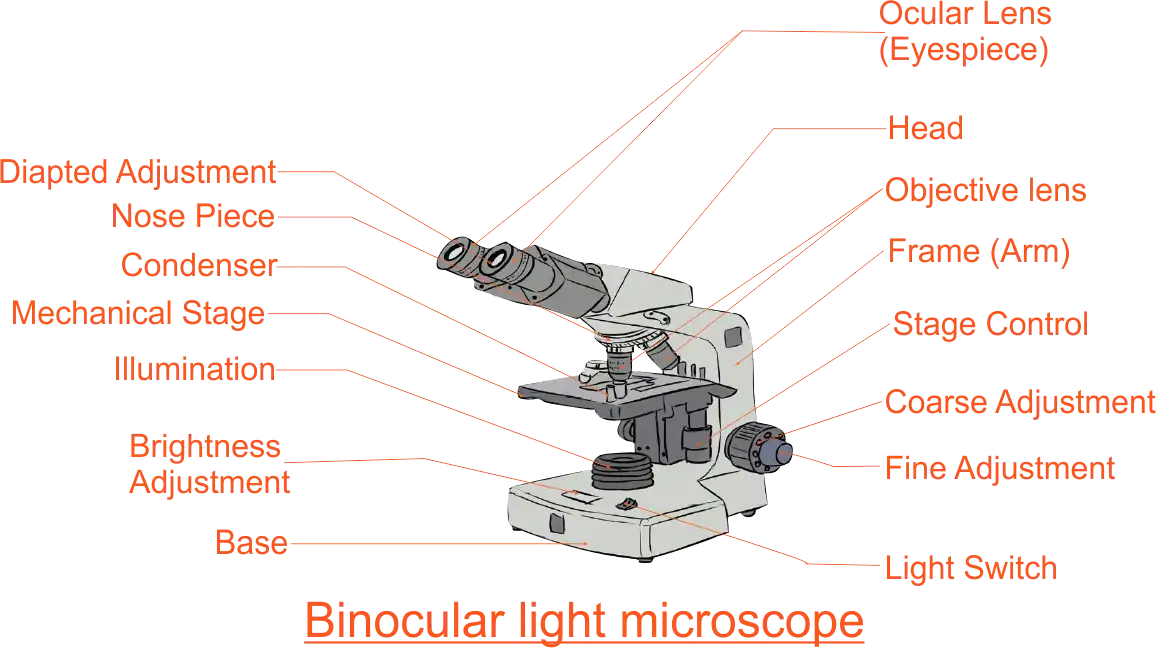 Binocular Light Microscope
- Base: Supports and stabilizes the microscope on the table or any other working place.
- Light source: It is made by a lamp or mirror which provides light for viewing the slide.
- Light source: Stage: This is a platform used to hold the specimen in position during observation.
- Stage clips: These are pliers used to fix and hold tightly the slide on stage.
- Arm: Supports the body tube of the microscope.
- Body tube: maintains the proper distance between the objective and ocular lenses
- Arm: used for holding when carrying the microscope and it holds the body tube which bears the lenses.
- Coarse focus adjustment: moves stage up and down a large amount for coarse focus.
- Fine focus adjustment: moves stage up and down a tiny amount for fine focus.
- Objective lenses: focuses and magnifies light coming through the slide.
- Revolving nosepiece: rotates to allow the use of different power objectives.
- Slide: is a transparent pane on which a specimen is placed.
- Eyepiece/ocular lens: magnifies the image produced by the objective lens.
- Condenser: It will gather the light from the illuminator and focus it on the specimen lying on the stage. The function of the condenser is to focus the light rays from the light source onto the specimen.
- Iris diaphragm lever: This allows the amount of light passing through the condenser to be regulated to see the object.
Use the light microscope
- Using the light microscope to observe under low power and low magnification:
- Objects (specimens) to be observed under the microscope are first placed on a glass slide and covered with a cover a slip.
- Place the specimen on the stage of your microscope; in other words, arrange it so that the specimen is exactly at the centre of the hole at the stage.
- Fix the slide in place with two clips.
- Rotate the nosepiece so that a small objective lens is immediately above the specimen.
- Set the angle of the reflector mirror so that light is directed up through the microscope.
- Look down the microscope through the eyepiece. Adjust the iris diaphragm so that the field of vision is bright and not dazzling.
- Turn the coarse adjustment knob until the tip of the objective lens is close to the slide.
- Now look down the microscope again. Slowly turn the coarse adjustment knob in the other direction, so the tube gradually moves upwards. The specimen on the slide should eventually come into view.
- Use the coarse and fine adjustment knobs to focus the object as sharply as possible.
- If necessary readjust, the iris diaphragm so the specimen is correctly illuminated. You will get a much better image if you don’t have too much light coming through the microscope.
- Using the light microscope to observe under high power at a greater magnification:
- Rotate the nosepiece so that the large objective lens (with higher magnifying power) is immediately above the specimen. The nosepiece should click into position, as before.
- If the specimen is not in focus, focus it with a fine adjustment knob. Be careful that the tip of the objective lens does not touch the slide.
- Readjust the illumination if necessary.
- Using the light microscope to observe under low power and low magnification:
Define, list and explain the types of the electron microscopes.
Electron microscopes use a beam of accelerated electrons as a source of illumination.
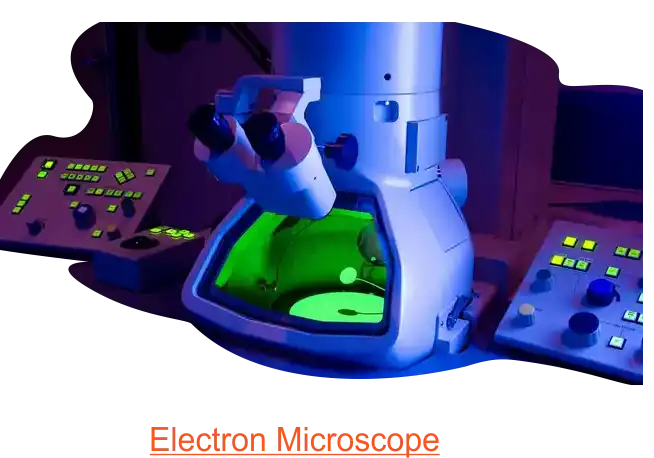 Transmission Electron Microscope
Types of electron microscopes are:
-
Transmission electron microscope (TEM):
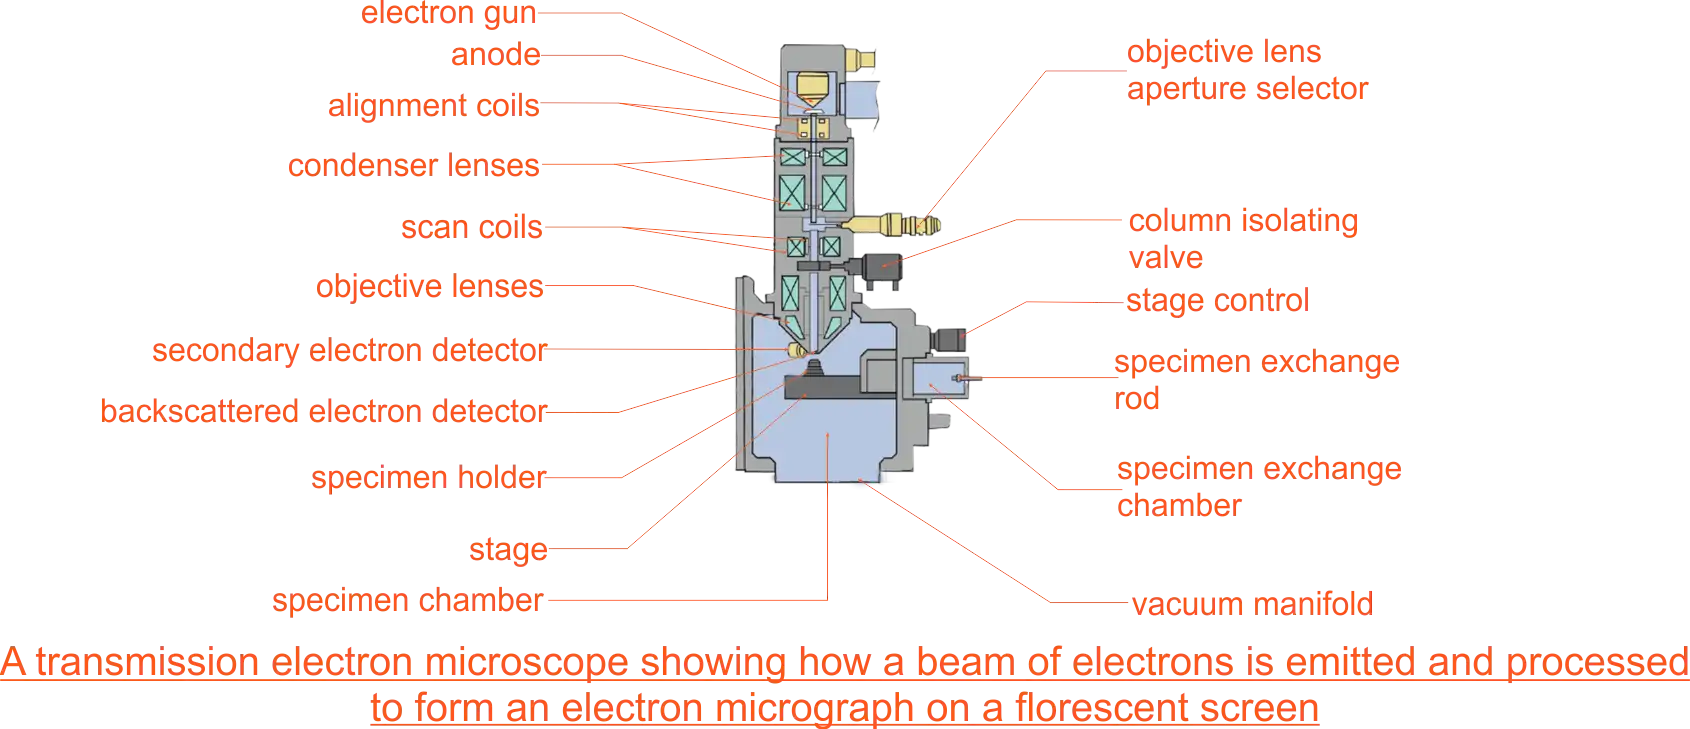 Transmission Electron Microscope
- Extremely thin samples of the specimen are needed and are cut by using diamond or glass knives as they are supported in resin blocks to prevent them from collapsing.
- The section is then impregnated with a heavy-metal stain.
- As the beam pass through the specimen, electrons are absorbed by the heavily stained parts but passes readily through the lightly stained parts.
- Electromagnets bend the electron beam to focus an image onto the florescent screen or photographic film to form an electron micrograph.
- Scanning electron microscope (SEM):
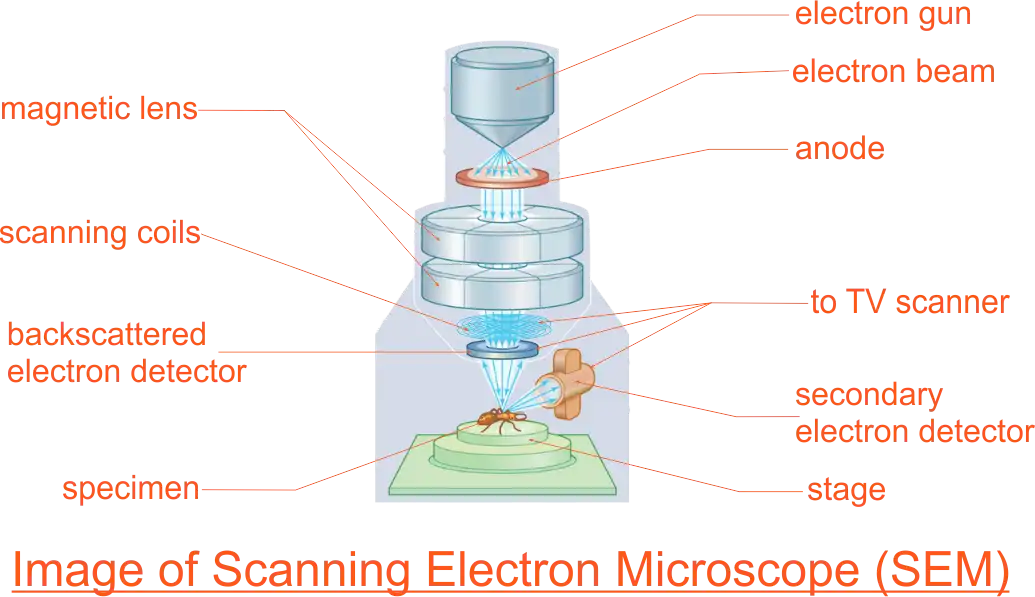 Scanning Electron Microscope
The SEM is used to produce 3D images of the surfaces of the specimens. Electrons are reflected from the surface of the specimen stained with heavy metal. This enables the SEM to produce images of all specimens, cells, tissues, or even organisms
-
Transmission electron microscope (TEM):
List Advantages of the electron microscope over the light microscope.
The electron microscope has a higher resolution and is, therefore, able of a higher effective magnification estimated at up to 250,000 million times compared to the light microscope which can show a useful magnification only up to 1000-2000 times. This is because a light microscope uses a beam of light with a longer wavelength while Electron microscopes use a beam of electrons that have a short wavelength.List Disadvantages of the electron microscope.
- They are extremely expensive and the maintenance costs are high.
- Sample preparation is often much more technical requiring special training.
- Samples must be dead, exposed to high radiation and are placed in a vacuum so that it is impossible to observe living specimens
- It is not possible to observe colours because electrons do not possess a color. The image is only black-white, even if sometimes the image is colored artificially to give a better visual impression.
- They require more training and experience in identifying artefacts that may have been introduced during the sample preparation process
Comparison between light and electron microscopes
- Both light and electron microscopes form larger (magnified) and more detailed (highly resolved) images of small objects or small areas of larger objects.
- Both light and electron microscopes are used in biology study, research and medical sciences particularly histology, material sciences such as metallurgy and other aspects of science.
- Specimens must be carefully prepared using techniques appropriate for both the equipment and the sample including slicing, staining, and mounting.
List the differences between light and electron microscopic.
CRITERIA LIGHT MICROSCOPES ELECTRON MICROSCOPES Size Smaller and lighter, so are easier to move and set-up Large and heavy, so are not easier to move and set-up Cost Less expensive Very expensive Radiation type Use light (approximate wavelength: 400-700 nm) Use beams of electrons (approximate equivalent wavelength: 1 nm). Control of image formation Light via glass lenses Beams of electrons can be focused using electromagnets due to the negative charges of electrons. Resolution Lower resolution than electron microscopes (200nm) Higher-resolution - good for measuring sizes of smaller features (1nm) Magnification Lower magnification than electron microscopes (x2 000) Higher magnification - so several micrographs may be needed per specimen (x1 000 000) Depth: 2d or 3d images Image plane approximate flat (2d) but, as above, can adjust the focus through the specimen. 2d only in TEM. SEM shows surface images, hence depth info that seems like 3d Thickness of specimen The specimen must be thin but can adjust focus to different positions (heights) within thin specimen on a glass slide Very thin sections in TEM and images surfaces in SEM Color images Images including the range of wavelengths (colours) are provided by the light source. colours seen are often due to stains rather than the actual colours present in nature Produce greyscale black and white images. False-color electron micrographs are common Preparation of specimens Simpler preparation and staining is still required Harsher preparation procedures include the use of corrosive chemicals that may cause artefacts in the resulting micrographs Living cells and tissues Can watch living processes take places such as microscopic pond life in action, and even cell division Not possible to view any living material due to vacuum inside the electron microscope Image formation Images can be viewed directly Require the use of a fluorescent screen, photographic plate, or electronic display because electrons cannot be observed directly by the human eye. Usage limitations Living or dry specimens can be viewed directly Living specimens cannot be viewed because electron microscopes require a vacuum in the tube - otherwise, the electrons would be absorbed by air molecules Care of the compound microscope
- Carry the microscope with both hands, one hand under the base, and the other on the arm.
- When getting ready to put the microscope away, always return it to the low power or scanning power setting.
- When setting the microscope on a table, always keep it away from the edge.
- It is generally better to clear your lab table of iTEMs that are not being used.
- Never clean lenses with anything other than lens paper, don’t use towels and other paper tissues because they scratch the lens.
- Inform the instructor or the biology lab technician if there is any microscope damage or irregularity in its operation as soon as possible. Do not return a faulty microscope without first informing the instructor or lab technician.
- You are responsible for the microscope while using it treat it with care!
Rationale:
The microscope is important because biology mainly deals with the study of cells (and their contents), genes, and all organisms. Some organisms are so small that they can only be seen by using magnifications of X2000 - X25000, which can only be achieved by a microscope. Cells are too small to be seen with the naked eye. Genetics is the study of variations in an organism generation after generation. Genetic engineering requires the mixing of genes. Genes are even smaller than cells, which is why microscopes are essential to genetics. Without the microscope, biology would not have been so developed and many diseases would still have no cure.
Prerequisite/ Previous knowledge:
The learners can point out scientific activities that require the use of the microscope in our daily lives.Learning Materials:
Microscopes, micrographs, writing materials, and diagrams.Reference Materials:
- Kent M. (2000). Advanced Biology. Oxford University Press, Oxford, UK.
- Campbell, N.A, et al. (2008). Biology, Pearson International Edition, San Francisco, USA, 8th edition.
- Pete K. Frank S. (2008). OCR Biology. Pearson Education Limited. British.
- Miller, Levine (2008). Prentice-Hall Biology. Pearson Education. The USA.
- Online resources.
Lesson Development:
| STAGE | TEACHER'S ACTIVITY | LEARNER'S ACTIVITY | LEARNING POINTS | |||||||||||||||||||||||||||||||||||||||||
|---|---|---|---|---|---|---|---|---|---|---|---|---|---|---|---|---|---|---|---|---|---|---|---|---|---|---|---|---|---|---|---|---|---|---|---|---|---|---|---|---|---|---|---|---|
| INTRODUCTION full class session (10 mins) |
Asking some questions:
|
Learners' expected response.
| Learner’s entry points. Competences: Critical thinking, Communication. |
|||||||||||||||||||||||||||||||||||||||||
| STEP 1 10 mins. Development | Ask students to form three groups. | Form three groups and share responsibility. | Inculcating leadership skills, competitive spirit, cooperation, teamwork, and a sense of responsibility among learners. | |||||||||||||||||||||||||||||||||||||||||
| The teacher informs learners that some of the living things including Protoctista and fungi have a small size to be observed by naked eyes. The teacher thereafter ask learners to discuss in groups the ways used by biologists to observe and identify different parts of these living organisms. Teacher to provide learners with materials (microscopes, microcell, and prepared micrographs or diagrams containing the structures of different animal cells and plant cells, etc) and instructions and allow them to identify the materials, and guide learners to defined the compound light microscope. | Students discuss ways used by a biologist to observe and identify organisms that are small in size; magnified lens and microscope. Students identify materials provided by the teacher as microscopes, micrographs, and structures of animal cells and plant cells. Hence define Compound Light Microscope with the aid of the teacher.The optical microscope often referred to as a light microscope is a type of microscope that uses visible light and a system of lenses to magnify images of small samples. | Being able to define the Compound Light Microscope and identify the materials/apparatus. Competencies: Problem-solving, communication, manipulation, cooperation, and Critical thinking. |
||||||||||||||||||||||||||||||||||||||||||
| The teacher-guided learners in groups to identify parts of the compound light microscope. The teacher points to each part of the compound microscope and asks learners to list and explain each of the parts.
Monitor how the students are progressing towards the knowledge, skills, and attitudes to be learned and boost those who are still behind (but without communicating to them the knowledge). |  Monocular Light Microscope
 Binocular Light Microscope
The students follow the teacher's directives. Students work collaboratively on the task. Both boys and girls participate actively to identify and explain the parts of the microscope.
| The different parts of the light microscope | ||||||||||||||||||||||||||||||||||||||||||
| STEP 2 Using the light microscope (10 mins) | The teacher-guided learners in the group on how to use the compound microscope to:
| Learners follow teachers directives:
| Communication; Using the light microscope. | |||||||||||||||||||||||||||||||||||||||||
| STEP 3 Analysing Light and Electron microscope. 5 mins | Ask students to discuss the advantages and disadvantages of the electron microscope over the light microscope in groups. | Students share their observations.
|
Collaboration among group members, manipulation of results, and observing the advantages and disadvantages of the electron microscope over the light microscope. | |||||||||||||||||||||||||||||||||||||||||
| The teacher asks learners to the comparison between light and electron microscopes. |
Learners compare light and electron microscopes. | Comparison between light and electron microscopes. | ||||||||||||||||||||||||||||||||||||||||||
| The teacher asks learners to list the differences between light and electron microscopic. |
| Listing the differences between light and electron microscopic. | ||||||||||||||||||||||||||||||||||||||||||
| STEP 4 Care of the compound microscope. | The teacher asks learners to list the care of the compound microscope. |
| Care of the compound microscope | |||||||||||||||||||||||||||||||||||||||||
| EVALUATION 10 mins | The teacher asks the students questions.
|
| Asking the learners questions to assess the achievement of the set objectives. | |||||||||||||||||||||||||||||||||||||||||
| CONCLUSION 2 mins | Teachers wrap up from the learners' observations, summarise the learned knowledge, and give more clarification on the learned content. The microscope uses transmitted light for observation. However, a microscope uses specific light characteristics for specific samples, such as transparent specimens and samples that do not pass light. All parts of a microscope work together, the light from the illuminator passes through the aperture, through the slide, and through the objective lens, where the image of the specimen is magnified. Then the magnified image continues up through the body tube of the microscope to the eyepiece, which further magnifies the image the viewer can see. Light from the source is focused on the specimen by the condenser lens. It then enters the objective lens, where it is magnified to produce a real image. The real image is magnified again by the ocular lens to produce a virtual image that is seen by the eye. | Participate actively in summarizing the content. Making short notes. | Listening skills, Writing skills. | |||||||||||||||||||||||||||||||||||||||||
|
|
||||||||||||||||||||||||||||||||||||||||||||
| Assessment/ Assignment: 5 mins | The teachers give learners a take home and engage students to work individually.
| Do exercises. | Competences: Creativity. | |||||||||||||||||||||||||||||||||||||||||