Lesson Plan On Basic Technology
Woodwork Hand Tools
Subject: Basic Technology
Theme: Woodwork Hand Tools
Topic: Tools and Objects Production.
Sub Topic: Carpentry tools.
Date: dd/mm/yyyy
Class: JSS 1
Duration: 35 Minutes
No of Learners: 30
Learning Objectives:
By the end of the lesson learners should be able to:Say what carpentry means.
Carpentry is the art of making wooden products.Say what carpentry tools are.
A tool is a handheld device used to carry out a particular function. Carpenters use carpentry tools to make wooden products.List usage and maintenance of some carpentry tools
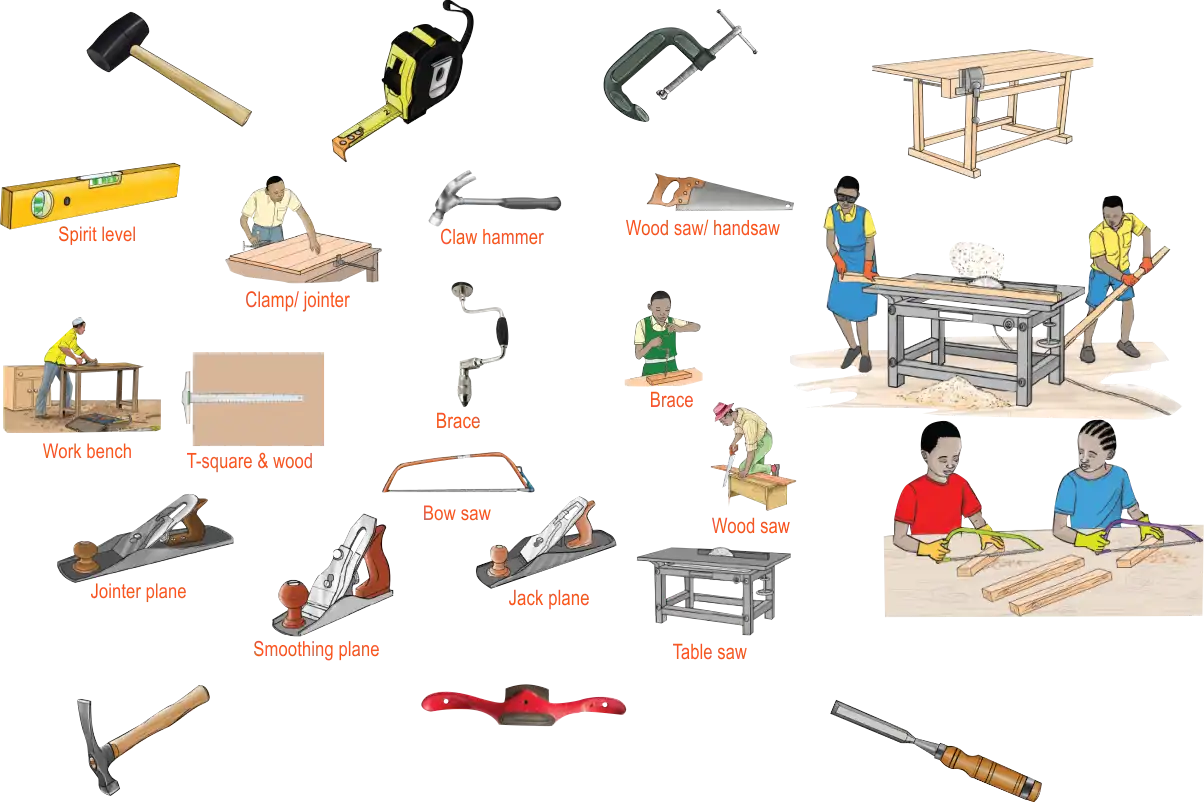
- Workbench: It is a surface on which a carpenter does her or his work. Work that can be done on it includes smoothing wood, cutting, measuring and making joints on wood.
Such as:- Placing a piece of wood on the workbench and cut it into two using a saw.
- Smoothen one part of the wood on the workbench.
- Maintenance of a Workbench:
- Remove all the tools that are not in use from the workbench. Wipe the bench and check if that is firm and stable.
- Saw: There are various types of saws. Examples are: Table saw, bow saw and wood saw.
- Bow saw: This is also known as a frame saw or bucksaw. It is used to make straight and curved cuts on wood.
- Table saw: It is made up of a circular blade that is moved by an electric motor. The blade is held in place by a table or bend. It is used to cut a block of wood into small pieces.
- Wood saw: It is commonly called the handsaw. It is used to cut pieces of wood into different shapes and sizes.
- Maintenance of a Saw:
- Check if the hand saw blade is sharp, if it does not sharpen it using a file. Check if the handle is in good condition.
- After using the saws remove pieces of wood shaving stuck on the blade using a stick.
- T-square: It is used for drawing and measuring right-angled objects.
Maintenance of a T-square:- Clean the parts to remove dust and sawdust. Store the T-square safely after use.
- Apply oil on the metallic parts of the T-square to prevent rusting.
- Claw hammer: It is used for driving nails in wood and also for pulling it out.
Maintenance of a Claw hammer:- Store the hammer in a dry and safe place after use.
- Plane: It is used for smoothing wood to give smooth and shiny surfaces. Examples of planes are: Jointer plane, Smoothing plane and Jack plane.
Maintenance of a Plane:- Adjust the blade to the desired angle. Oil the plane.
- Store the plane in a dry and safe place after use.
- Axe: An axe is used for splitting and cutting wood. It is also used for cutting down trees and uprooting stumps.
Maintenance of an Axe:- Look at the blade of the axe. Is it sharp?
- Sharpen blunt cutting edges of the axe.
- Replace the worn-out blades with new ones.
- Ensure the axe is firmly fixed to the handle.
- Clean the blade and store the axe in a clean dry place.
- Look at the blade of the axe. Is it sharp?
- Screwdriver: It is used to drive screws in wood. It is also used to remove screws out of wood.
Maintenance of a Screwdriver:- Ensure the tip of the screwdriver is not damaged. Replace broken or worn-out handles.
- Clean the screwdriver and store the axe in a clean dry place.
- Brace: The brace is used for boring holes in wood. Force is applied on top and the handle rotated with one hand.
Maintenance of a Brace:- Ensure that the handle and the head of the brace are well fixed.
- Ensure that the cutting tip of the brace is sharp.
- Clean and store the brace in a clean and dry place.
- Clamp/ Jointer: A clamp is used to hold together pieces of wood to be glued. It also holds together the glued parts until the glue is dry and the pieces of wood are firmly jointed.
Maintenance of a Clamp/ Jointer:- Check and ensure the screw and other moving parts of the clamp are oiled and functioning well.
- Blow out dirt from the joints of the clamp and wipe it with a moist piece of cloth.
- Clean and store the Clamp/ Jointer in a clean and dry place.
- Spirit level: It is used to check if the wood surface is horizontal or vertical. The spirit level is placed on a wooden surface, then the position of the bubble in the viewing point is noted. Hold the spirit level firmly when using it. Do not let it drop on a hard surface because it can easily break.
Maintenance of a Spirit level:- Wipe the surface of the spirit level to remove dust and dirt from it.
- Workbench: It is a surface on which a carpenter does her or his work. Work that can be done on it includes smoothing wood, cutting, measuring and making joints on wood.
Rationale:
Carpentry tools are used by carpenters to make furniture. In our homes, we have different pieces of furniture. Carpentry tools need to be used and maintained the property as they are the source of livelihood to many. Carpentry is also a source of revenue for our country. This lesson will encourage learners to use and maintain common carpentry tools.
Prerequisite/ Previous or Assumed knowledge:
Learners know of wooden/ furniture products such as Chair, Table, Shelf, Bed, Desk etcLearning Materials:
Carpentry tools, Charts, Pictures, TextbooksReference Materials:
Basic Technology Book 1 by R. Abu et al.Online resouces.
Lesson Development:
| STAGE | TEACHER'S ACTIVITY | LEARNER'S ACTIVITY | LEARNING POINTS |
|---|---|---|---|
| INTRODUCTION full class session (5mins) | The teacher asks the learners to name some furniture objects at home, offices, school, etc. | Learners expected to respond. Chairs, Tables, Beds, and Cupboards, Desk, kitchen cabinets and bookcases etc. |
Confirming the previous lesson. |
| DEVELOPMENT Step 1 full class session (5 mins) | The teacher asks the learners, who made these furniture tools listed in the learner's activities above and with what material were they made. | Learners expected to respond. The tools were made by the carpenters and are made of wood. |
Developing the concept of carpentry. |
|
|
|||
| DEVELOPMENT Step 2. Group Work (2 mins) | The teacher guides the learners to form four groups and ask them to choose their leaders and secretaries. | Learners choose their group leaders and secretaries. | Inculcating leadership skills, competitive spirit, cooperation, teamwork and a sense of responsibility among learners. |
| Step 3 Full class session (7 mins) | The teacher asks learners in a group, what profession of persons make use of the tools display at the board/ ground or screen as the case may be (if the school has live carpentry tools the teacher should bring them out from the store for the learners to examine and identify). The teacher should also ask and guide the learners to names each of the tools. |
Learners expected response; The tools are used by the carpenters. The tools are: Spirit level, Brace, Clamp, Claw hammer, screwdriver, T-square, Plane, Saw, Word bench, chisel, tap, etc. |
Introducing the topic Carpentry tools. |
| The teacher writes the topic on the board and asks learners to define carpentry and what carpentry tools are in their own words | Learners expected to respond; Carpentry is the art of making wooden products. Carpenters use carpentry tools to make wooden products. |
Meaning of carpentry and carpentry tools. | |
|
|
|||
| Stage 4 Full class discussion (10 mins) |
The teacher asks the learners in a group study the pictures on the board and explains how the tools in the pictures are used by the carpenters. If the school has a carpentry workshop, the teacher should take the learners to the workshop and guide learners to perform the following activities with the use of the carpentry tools.
|
Learners expected to respond.
|
Use of carpentry tools. |
| The teacher asks learners to discuss in a group how these carpentry tools can be maintained in other to prolong its life span and to make it work effectively whenever it is used. | learners expected to respond;
|
Maintainance of carpentry tools. | |
|
|
|||
| Evaluation. Full class session (10 mins) | Ask the following questions to evaluate the achievement of the set objectives.
|
Learners expected to response:
|
Confirming the achievement of the set objectives. |
| Conclusion, full class session (3 mins) | Ask learners, what are general maintenance practices of carpentry tools. | Learners expected to response.
|
Acquiring/ improving understanding of carpentry tools. |
|
|
|||
| ASSIGNMENT | The teacher gives learners a take home. Draw and name the following carpentry tools. |
Learners answer other questions. | Improving their level of understanding of carpentry tools. |